In this post, I’ll walk you through how I set up Vaultwarden, a self-hosted password manager, on my Ubuntu server running Casa OS, with Tailscale to securely access it over a private Tailnet. I’ll also cover how to connect to it via the Bitwarden app and enable two-factor authentication for added security.
Step 1: Install Vaultwarden on Casa OS
- Open Casa OS App Store:
- Navigate to the app store in Casa OS and search for Vaultwarden.
- Select Custom Install to configure the setup with your desired settings.
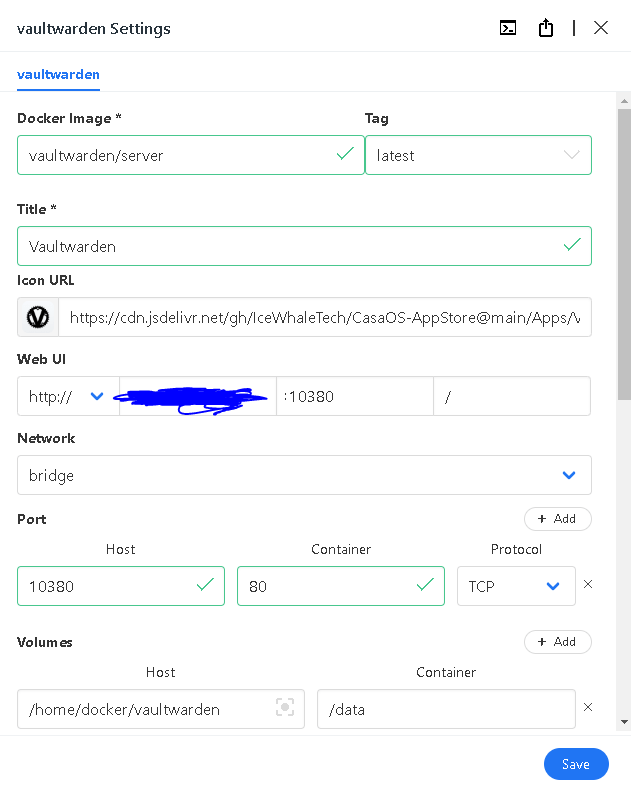
- Configure Vaultwarden Installation Details: Docker Image:
vaultwarden/serverTag:latestTitle:vaultwardenWeb UI:http://<casaosIP>:10380Host Port:10380Container Port:80Host Volume:/home/docker/vaultwardenContainer Volume:/dataRestart Policy:unless stoppedContainer Name:vaultwardenOnce you’ve entered the details, start the container to run Vaultwarden.
Step 2: Enable HTTPS in Tailscale
Next, I configured Tailscale to serve Vaultwarden securely over my Tailnet.
- Go to the Tailscale Admin Console:
- Log in to the Tailscale admin console and enable HTTPS for your Tailnet domain.
- Check DNS Settings:
- Navigate to the DNS section in the admin console.
- Ensure that MagicDNS is enabled.
- Enable HTTPS for Vaultwarden:
- Under the HTTPS Certificates section, click Enable HTTPS for your Vaultwarden domain.
Step 3: Obtain a Tailscale Certificate
To get a valid certificate for my Vaultwarden instance:
- Run the Tailscale Cert Command:
- Open the terminal in Casa OS and run the following command:
sudo tailscale certThis will generate a certificate for your machine’s Tailnet domain.
- Open the terminal in Casa OS and run the following command:
Step 4: Proxy Vaultwarden with Tailscale Serve
Now, I needed to proxy Vaultwarden through Tailscale to access it securely over the Tailnet.
- Set Up the Proxy:
- In Casa OS terminal, run the following command to proxy Vaultwarden:
sudo tailscale serve --bg 127.0.0.1:10380This proxies the Vaultwarden container running on port 10380 to your Tailscale Tailnet.
- In Casa OS terminal, run the following command to proxy Vaultwarden:
- Verify the Proxy:
- Run the command below to check the status of the Tailscale Serve proxy:
tailscale serve statusIf it’s working correctly, you should see the proxy details.
- Run the command below to check the status of the Tailscale Serve proxy:
Step 5: Access Vaultwarden via Tailnet
Now, Vaultwarden should be accessible securely via your Tailnet.
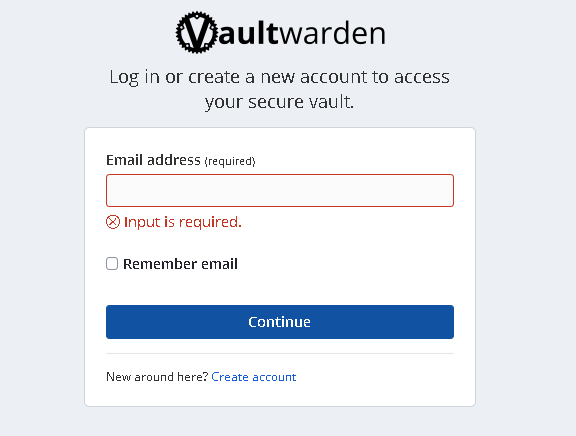
- Go to the Tailnet URL:
- Open your browser and navigate to the Tailnet domain:
https://machine-name.tail-net.ts.net - You’ll be prompted to create a Vaultwarden account. Be sure to use a strong, secure password.
- Open your browser and navigate to the Tailnet domain:
Step 6: Troubleshoot HTTPS Security
Initially, I encountered a “Not Secure” warning even though I was using an HTTPS connection.
- Check in Incognito Mode:
- I opened the Tailnet URL in incognito mode and confirmed that the connection was secure.
- Clear Browser Cache:
- After verifying the secure connection in incognito, I cleared my Chrome cache and was able to get a secure connection in regular browsing mode as well.
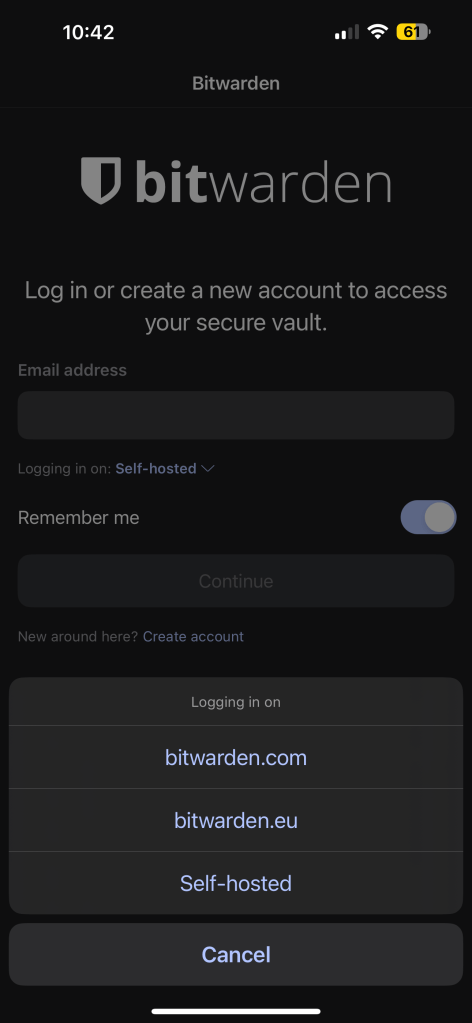
Step 7: Set Up Bitwarden App for Self-Hosted Vaultwarden
To use the Vaultwarden instance on my mobile device, I downloaded the Bitwarden app.
- Download the Bitwarden App:
- Install the Bitwarden app on your mobile device from the App Store (iOS) or Google Play Store (Android).
- Select the Self-Hosted Option:
- On the login screen of the Bitwarden app, tap the Server URL dropdown and select the Self-Hosted option.
- Enter Your Tailnet URL:
- Set the Server URL to your Tailscale-provided domain (e.g.,
https://machine-name.tail-net.ts.net).
- Set the Server URL to your Tailscale-provided domain (e.g.,
- Login to Vaultwarden:
- Use your Vaultwarden login credentials to sign in to the app.
Step 8: Enable Two-Factor Authentication
For an added layer of security, I enabled two-factor authentication (2FA) using the Google Authenticator app.
- Enable 2FA in Vaultwarden:
- Log into Vaultwarden via the web UI and go to your account settings.
- Follow the steps to enable two-factor authentication. Vaultwarden will provide a QR code for you to scan.
- Use Google Authenticator:
- Open the Google Authenticator app (or any TOTP app) on your mobile device and scan the QR code.
- Enter the authentication code to complete the setup.
Final Thoughts
Setting up Vaultwarden in Casa OS with Tailscale was straightforward, and enabling HTTPS through Tailscale Serve ensured that my password manager was securely accessible over the Tailnet. With the added security of two-factor authentication, my self-hosted password management system is now both private and robust.

Leave a comment