Recently, I took on the challenge of creating a simple office network in Cisco Packet Tracer, following a tutorial I found on YouTube. My objective was to simulate a small network with both wired and wireless devices, connected through a router that would handle DHCP for the entire network. Here’s how I approached it and how everything came together.
Step 1: Adding the Devices
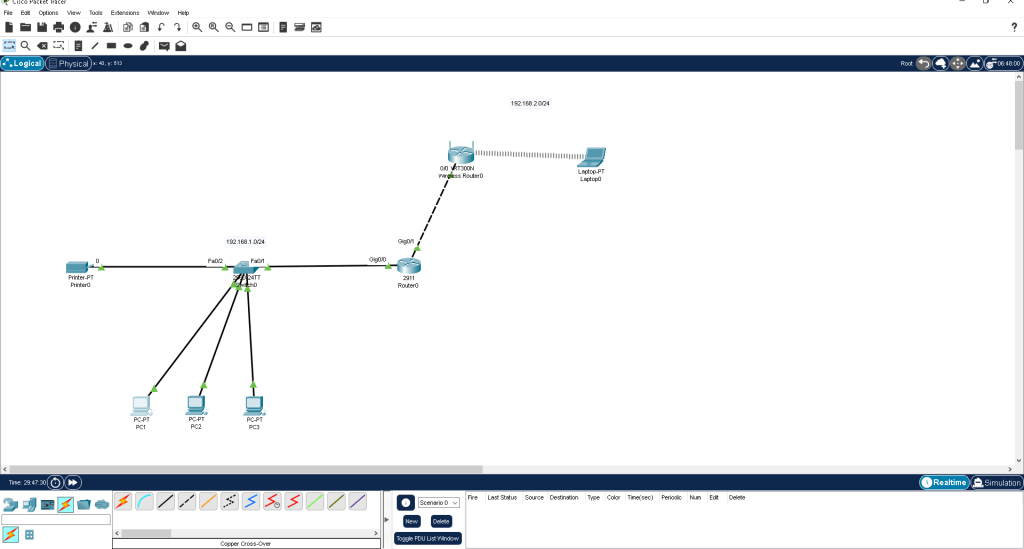
To begin, I added three PCs, a printer, and a laptop into Packet Tracer. For networking devices, I used a 2911 router, a 2960 switch, and a WRT300N wireless router.
Step 2: Connecting Everything
Using copper straight-through cables, I connected the PCs and printer to the switch, and a crossover cable to connect the two routers. I divided the network into two subnets:
- 192.168.1.0/24 for the wired network
- 192.168.2.0/24 for the wireless network
Step 3: Configuring the Router
Next, I opened the CLI on the router and configured its interfaces. I set 192.168.1.1 as the default gateway for the wired network and 192.168.2.1 for the wireless. After configuring the IPs, I enabled the interfaces with the no shut command. Finally, I set the router as a DHCP server for both networks, assigning IP ranges for each segment.
Step 4: Setting Up the Wireless Router
I switched over to the wireless router’s GUI and configured the SSID to “OfficeWiFi” with WPA2 Personal security. I set a password and ensured the DHCP server was enabled.
Step 5: Connecting the Laptop to Wi-Fi
After swapping the laptop’s Ethernet NIC with a wireless NIC, I connected it to the wireless network. The laptop was then assigned an IP address from the 192.168.2.0/24 subnet through DHCP.
Step 6: Setting Up the Printer
I configured the printer with a static IP address of 192.168.1.101 to ensure it remained accessible on the wired network.
Step 7: Testing Connectivity
Finally, I used the ping command from PC1 to test connectivity with the other devices. All devices, including the PCs and printer, successfully communicated with each other, confirming that the network was functioning correctly.
What I Learned
This project taught me several important lessons about networking:
- Understanding Cable Types: I learned the difference between straight-through and crossover cables and when to use them.
- IP Addressing & Subnetting: Dividing the network into wired and wireless segments gave me insight into how subnets work and why they’re important in network organization.
- Router Configuration: Navigating the Cisco CLI was a major learning experience. From assigning IP addresses to enabling interfaces, it reinforced the role of routers in managing network traffic.
- Wireless Security: Configuring a wireless router and securing it with WPA2 was a great introduction to wireless security fundamentals.
- Static IP Assignment: Setting a static IP for the printer helped me understand why certain devices benefit from having a fixed address in the network.
- Connectivity Testing: Using the ping command to verify device communication highlighted the importance of thorough testing in network setups.
By the end of this project, I felt much more confident in my ability to configure and manage small networks. It was a great foundational exercise, and I’m excited to tackle more advanced scenarios in the future!

Leave a comment